
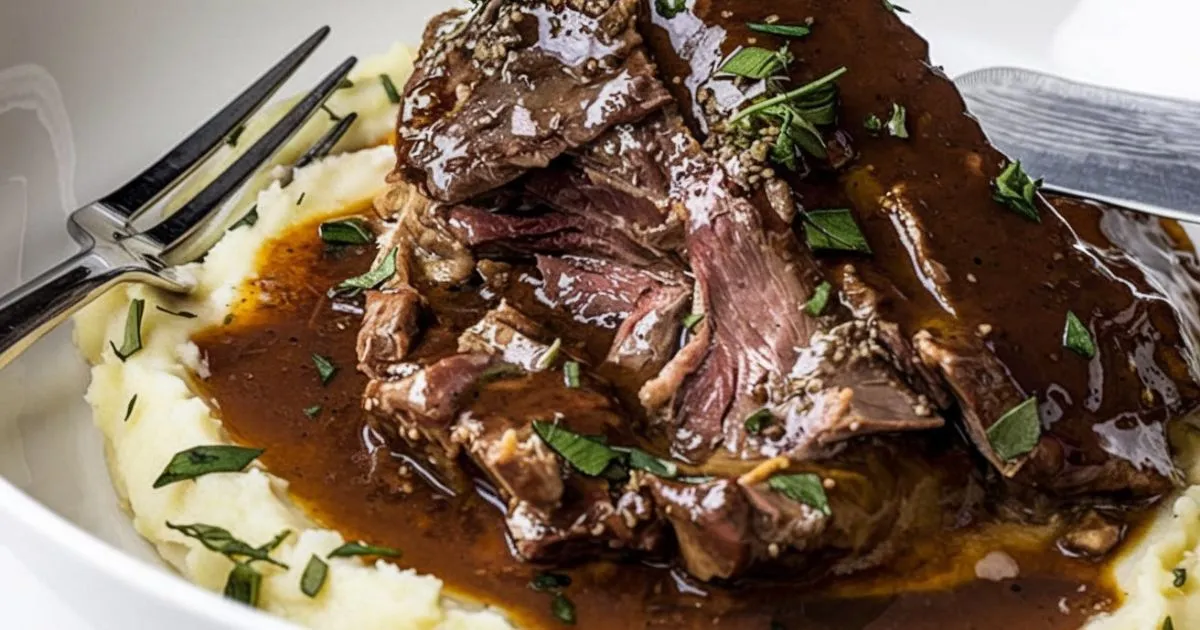
Beef cheek meat becomes so tender you could eat it with a spoon after proper cooking. This cut has evolved into a $35 delicacy at upscale restaurants. Home cooks can still get it at budget-friendly prices compared to other premium beef cuts.
My experience shows that beef cheeks aren’t complicated to cook if you use the right technique. The collagen-rich cuts turn incredibly moist and succulent with an 8-hour slow cook or a quick hour in the pressure cooker. Their versatility makes them perfect for dishes of all types, from traditional Mexican birria to elegant bistro-style preparations.
This detailed guide will help you achieve restaurant-quality results in your kitchen. You’ll get expert tips about selecting, preparing, and cooking beef cheek meat. The guide covers everything from proper trimming techniques to creating the perfect braising liquid.
What Is Beef Cheek Meat and Why Chefs Love It
“All this movement of the Cheek muscles means a lot of connective tissue which, on one hand requires slow gentle cooking but on the other hand rewards us with a cut of beef riddled with strands of tasty, healthy collagen, gelatin and rich savory beef.” — TruOrganicBeef, Premium grass-fed beef supplier
Beef cheek meat, as you might guess, comes straight from the cattle’s facial cheek muscles. These special cuts give diners an experience that chefs around the world have fallen in love with.
The anatomy of beef cheeks
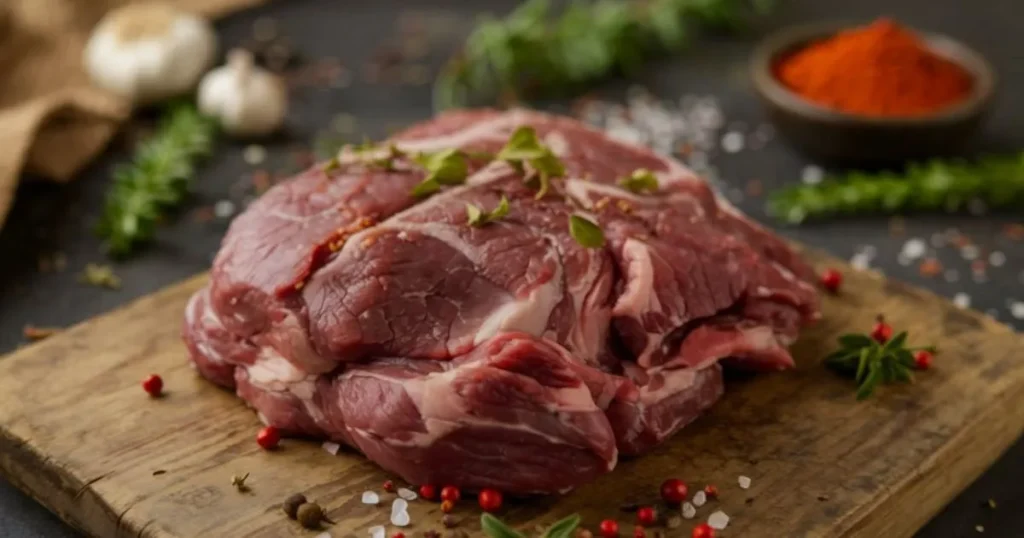
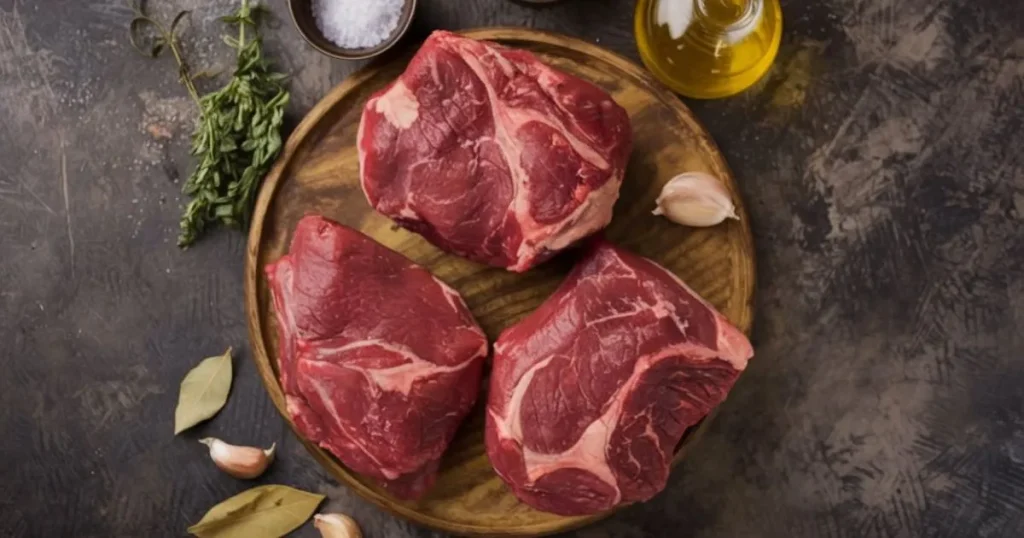
Cattle spend 6-8 hours daily chewing, which means their facial cheek muscles never rest. This constant movement creates a unique cut filled with connective tissue. A well-trimmed beef cheek looks like a small brisket with a triangular to oval shape and weighs about 12-14 oz.
The beef cheek’s surface texture sets it apart from other cuts. You’ll notice tiny pockmarked connective tissues throughout the meat. Fresh grass-fed beef cheeks show off a beautiful ruby-red color. Each cow gives just two cheeks, which makes them a specialty item that many butchers don’t keep in stock.
Nutritional profile and collagen content
The nutritional value of beef cheeks will surprise you. One serving packs about 46g of protein (92% of daily value) at just 426 calories. These cuts also give you 34% of your daily iron needs.
Beef cheeks stand out because of their amazing collagen content. Research shows they have the second-highest collagen levels of any cut, with only tripe having more. This rich collagen turns to gelatin during cooking and creates a unique texture that no other cut can match.
Why this cut creates restaurant-quality dishes
Michelin-starred restaurant chefs specifically look for beef cheeks because they cook beautifully. Angela Hartnett from London’s Murano restaurant points out that properly cooked cheeks become so tender “you’ll be able to cut them with a spoon”.
These cuts work like flavor sponges. Their collagen-rich tissue soaks up all the braising liquids, which results in incredibly moist, gelatinous meat. The natural absorption creates thick, restaurant-style sauces without extra ingredients.
Beef cheeks give you fine-dining results without breaking the bank. At roughly $15 per kilo, they hit the sweet spot between value, flavor, and that special touch that lifts home cooking to restaurant quality.
Selecting and Preparing Raw Beef Cheek Meat
Quality beef cheek meat isn’t easy to find in regular grocery stores. You need to know exactly where to look. Since each cow provides only two cheeks per cow, picking and preparing them the right way makes all the difference.
How to identify quality beef cheeks at the market
Beef cheeks rarely show up on standard grocery store shelves because of their limited availability. Your best bet is to call ahead and order from a butcher shop. The meat should have a deep red color with minimal fat. Good quality beef feels firm to the touch and stays cool in its packaging.
The smartest move is to ask your butcher to trim the cheeks. Skilled butchers know which tough sinew needs to go, which saves you a lot of prep time in your kitchen. On top of that, it helps support environmentally responsible meat practices when you buy from traditional “nose-to-tail” butchers.
Cleaning and trimming techniques
You’ll need to remove the outer layer of sinew and silver skin yourself if the cheeks aren’t pre-trimmed. Start by taking off the fat cap until you see the silver skin underneath. Take your sharp knife, slide it under the silver skin, and cut away from your body – just be careful not to take too much meat with it.
The tough exterior gristle needs to come off completely before cooking because it won’t break down even with long cooking times. The silver skin between the beef cheeks can stay put, though – this particular connective tissue softens up nicely during cooking.
Proper storage before cooking
Fresh beef cheeks stay good in the fridge for up to 3 days if kept below 40°F (4°C). They’ll last up to 6 months in the freezer.
Wrap the meat tightly in plastic before putting it in a freezer bag to avoid freezer burn[114]. The meat’s flavor gets better if you marinate it before freezing – this preserves and tenderizes it at the same time.
Raw beef cheeks should always go on the bottom shelf of your fridge, away from cooked foods. This prevents any drips from contaminating other items.
Essential Cooking Methods for Perfect Beef Cheeks
“Slow Cooked Beef Cheeks are so soft; you can eat them with a spoon” — TruOrganicBeef, Premium grass-fed beef supplier
Becoming skilled at cooking beef cheeks starts with picking the right method based on your schedule and equipment. These tough cuts just need slow, patient cooking to break down their collagen. This process creates that signature melt-in-your-mouth texture.
Slow cooker method (8-10 hours)
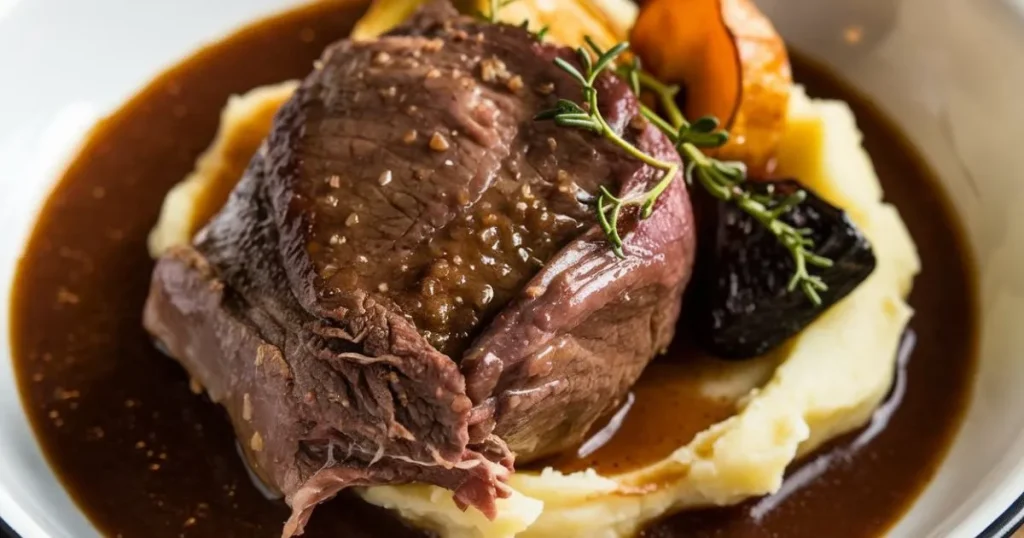
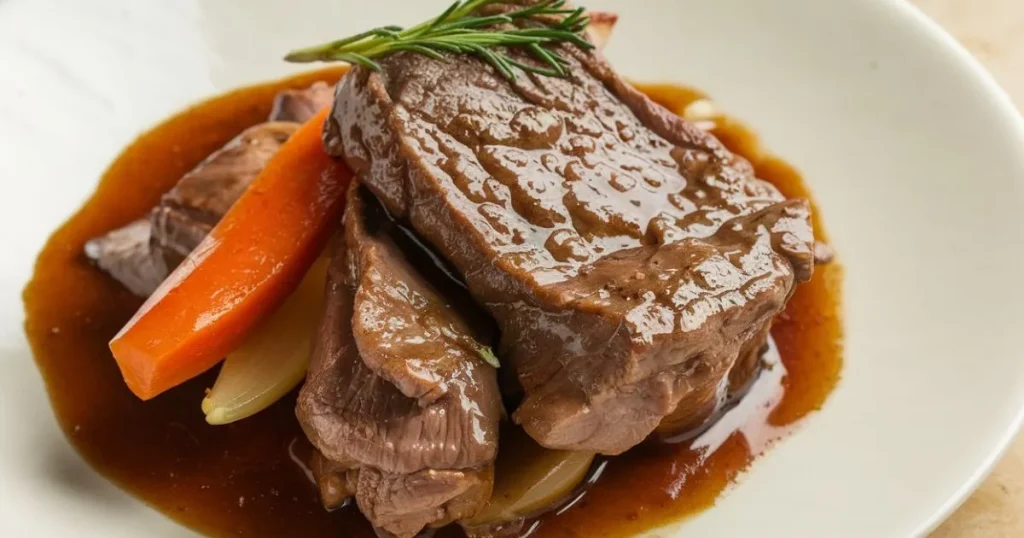
Your slow cooker changes beef cheeks into exceptionally tender meat with minimal effort. Start by browning the beef cheeks really well in a hot pan – this significant step develops a rich flavor. Next, sauté onions, carrots, and other aromatics before putting everything in your slow cooker. The braising liquid (wine, stock, or both) should reach about ¾ up the sides of the meat. Let it cook on low for 8-10 hours until the meat easily shreds with a fork. Most chefs suggest turning the cheeks halfway through cooking to ensure even tenderness. This approach works great to prepare meals ahead for dinner parties or busy weeknights.
Pressure cooker/Instant Pot method (1 hour)
The pressure cooker delivers quick results with similar tenderness. Brown the meat and add aromatics using the sauté function, then cook beef cheeks under high pressure. Small cheeks (8oz/250g) take about 40-50 minutes, while larger ones (12oz/350g) need 55-90 minutes. After cooking finishes, you can use either quick-release or natural-release pressure, depending on your recipe. The meat should pull apart easily when done.
Oven braising method (3-5 hours)
Oven braising produces exceptionally even results. Heat your oven to 275°F (160°C/135°C), then follow standard browning steps in a Dutch oven. A parchment paper cover before adding the lid helps prevent moisture loss. The meat should bake for 3-5 hours – check tenderness at the 3-hour mark. Professional chefs often prefer this method because it creates consistent results and develops rich sauce.
Stovetop method (2-3 hours)
Stovetop braising lets you control the entire cooking process. After browning and adding liquids, keep a gentle simmer (never boil) for 2-3 hours. Watch the liquid levels and add more if needed. Turn the cheeks once during cooking to ensure even tenderness. This method helps you monitor and adjust the cooking process as needed.
Mastering the Braising Liquid for Maximum Flavor
The braising liquid works its magic to turn tough beef cheeks into something extraordinary. A perfect blend of liquids and aromas creates a sauce that rivals the meat’s star power after hours of slow cooking.
Wine-based braising liquids
Red wine creates the perfect foundation for beef cheek braising liquids. The deep, warm, complex flavors seep right into the meat. You don’t need expensive wine to cook beef cheeks. Even expert food critics would find it hard to spot the difference between a $5 bottle and a $40 reserve Cabernet Sauvignon after hours of slow cooking.
Your wine-based marinade needs to boil before being used to boost flavor development. This method awakens the marinade’s flavors and removes most of the alcohol that might give the meat an unwanted tinny taste. The flavorful brown bits from the bottom of the pan need scraping when you deglaze with wine. These bits pack concentrated umami elements that add vital depth to your dish.
Stock and aromatics combinations
A classic mirepoix sits at the heart of any great beef cheek braising liquid. Diced onion, celery, and carrot cook until soft to create a balanced flavor base that complements the meat’s richness.
Garlic and tomato paste add complexity when cooked until fragrant for about a minute. Fresh or dried herbs like thyme, rosemary, and bay leaves bring essential aromatic notes. Beef stock pairs with wine to create depth, while balsamic vinegar or porcini mushrooms can add earthy undertones.
Creating the perfect sauce from braising liquid
The real transformation starts when beef cheeks become fork-tender. A handheld stick blender turns the braising liquid into a smooth, velvety sauce. The color changes from dark to light brown briefly. A fine mesh sieve works well if you prefer a refined, silky texture without vegetables.
The sauce needs to simmer over medium heat after blending. It darkens and reduces by about 1/4 to 1/3 in 3-5 minutes until it reaches a perfect gravy consistency. A small pat of butter stirred in at the end adds professional-level glossy richness. The sauce needs a final taste test with salt and pepper adjustments before serving.
Troubleshooting Common Beef Cheek Cooking Problems
Even seasoned cooks struggle with beef cheek preparation. The early detection of common problems can rescue your dish and turn disappointments into amazing meals.
Dealing with tough, undercooked cheeks
Do your beef cheeks feel tough after cooking? No need to worry – they just need extra time. Most meats toughen from overcooking, but beef cheeks work differently. Their collagen-rich tissue needs enough time to break down.
The solution for tough cheeks in a slow cooker is simple. Add another 1-2 hours of cooking time at a low temperature. “Beef cheeks are incredibly tough and take ages to braise,” says one professional chef. The meat usually needs 6-8 hours of total cooking time to reach perfect tenderness.
The meat’s internal temperature matters more than the cooking duration. Your beef cheeks should reach 203-205°F (95-96°C) inside. The connective tissues will turn into rich gelatin at this point and create that signature melt-in-your-mouth texture.
Fixing thin or overly thick sauces
The sauce consistency should be perfect after hours of cooking. Thin sauces need 3-5 minutes of uncovered simmering until reduced by about 1/4 to 1/3. The sauce will naturally darken and thicken during this process.
Thick sauce has an easy fix. Add small amounts of beef stock or wine while you stir constantly. One tablespoon at a time works best to avoid making the sauce too thin.
An immersion blender can elevate your sauce’s quality. The braising liquid becomes smooth and restaurant-worthy, coating the meat beautifully.
Proper resting and serving temperatures
The meat’s juices need about 20 minutes to redistribute. This vital step ensures your beef cheeks stay moist and tender.
Warm beef cheeks taste better than piping hot ones (around 140-150°F/60-65°C). The complex flavors developed during slow cooking shine through at lower temperatures.
Your beef cheeks will taste even better the next day. The flavors continue to blend overnight in the fridge. The meat stays good refrigerated for up to 4 days, or you can freeze it for later use.
Conclusion
Beef cheeks are proof of how simple ingredients transform into something extraordinary with the proper technique. Success comes from patience and attention to basics – selecting the right cut, creating the perfect braising liquid, and giving enough time for signature tenderness.
Professional chefs may charge premium prices for beef cheek dishes, but you can create these luxurious results at home now. Tough meat needs more time to cook properly, and the braising liquid matters just as much as the main ingredient.
Beef cheeks work perfectly in everything from casual family meals to elegant dinner parties. You should start with smaller portions until you become skilled at your preferred cooking method. Your fork-tender beef cheeks will soon match any restaurant’s quality.
FAQs
Q1. How long does it take to cook beef cheeks? Cooking time for beef cheeks varies depending on the method used. The slow cooker method takes 8-10 hours, the pressure cooker or Instant Pot method takes about 1 hour, the oven braising method requires 3-5 hours, and the stovetop method takes 2-3 hours. The key is to cook until the meat is fork-tender.
Q2. What’s the best way to prepare beef cheeks? The best way to prepare beef cheeks is to first brown them in a hot pan to develop a rich flavor. Then, slow cook them in a flavorful braising liquid with aromatics like onions, carrots, and herbs. This can be done in a slow cooker, pressure cooker, oven, or on the stovetop, depending on your preference and time availability.
Q3. Why are beef cheeks considered a delicacy? Beef cheeks are considered a delicacy due to their unique texture and flavor. When cooked properly, they become incredibly tender and absorb flavors from the braising liquid. Their high collagen content transforms into gelatin during cooking, creating a rich, melt-in-your-mouth experience that’s highly prized in fine dining.
Q4. How do I know when beef cheeks are cooked properly? Properly cooked beef cheeks should reach an internal temperature of 203-205°F (95-96°C). At this point, the meat should be so tender that it can be easily shredded with a fork. If the meat is still tough, it needs more cooking time. Remember, with beef cheeks, toughness indicates undercooking rather than overcooking.
Q5. What’s the best braising liquid for beef cheeks? The best braising liquid for beef cheeks typically includes a combination of red wine and beef stock. This is often enhanced with aromatics like onions, carrots, celery, garlic, and herbs such as thyme and bay leaves. Some recipes also incorporate tomato paste or balsamic vinegar for added depth of flavor. The key is to create a rich, flavorful liquid that will infuse the meat during the long cooking process.